| |
|
Although the major portion of the wing construction is complete, there are several small details which must be carefully attended to before I can move on to the ailerons and flaps. These include fabricating and installing the aileron and flap brackets, installing the gap fairings, and some other junk. |
| |
|
7/26/04 - J Stiffeners - 2 hours
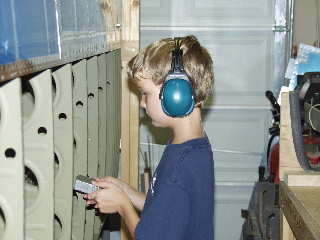
I needed to get the J-stiffeners riveted in place before removing the wings from the wing stand, but the only people who were willing to help were my twin 9-year-old boys, Danny and Jonny. So, I did what any self-respecting RV builder would do: I gave them a quick lesson on bucking rivets! Guess what? They did great! The best part is that they can easily reach into those small spaces between the root ribs! |
 |
| |
|
7/27/04 - Wings in cart - 1 hour
With all of the riveting on the top skins completed, I was finally able to remove the wings from the wing stand and place them into the rolling cart I built. I was also able to disassemble the wing stand, which has been in my way for long enough. Now I can once again open my garage door! Woohoo!
I went ahead and attached the bottom skins with clecoes so I could organize the rest of the "hangar" and get ready for the fuselage to be delivered next week. |
 |
| |
|
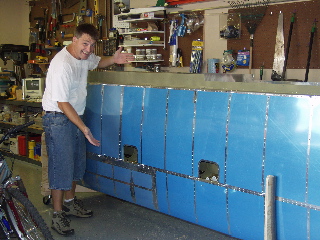
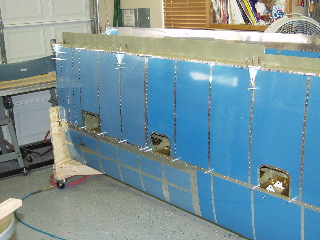
The wings are light, as you might expect, but still bulky enough to require two people to carry off the stand and flip over into the wing cart.
Here's a look at the space available between the wings while they are in the cart. Plenty of room for accessing the tops for whatever reason. |
 |
| |
|
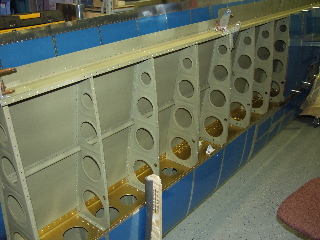
The instructions suggest placing the wings on a flat surface to work on the rear spars, but I think it is a better idea to work with the wings in the cart. With the bottom skins removed I have nice and easy access to the rear spar, which is where a lot of work still needs to be done. I also noticed a few rivets on the rear spar which I don't like, so I am able to very easily drill these out and squeeze new ones. |
 |
| |
|
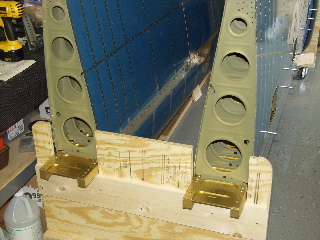
Finally, just for fun, I clecoed one of the aileron brackets in place to see how well they were going to fit. Perfect.
I need to get some more primer from the Sherwin Williams store before I can do any priming. Oh well, it looks like there are several brackets that need fabricating.... |
 |
| |
|
8/5/04 - Flap Brackets - 3 hours
It's time to get back to work on the project after an extremely nice visit to Oshkosh. After seeing all of the examples of completed RVs, I am pumped up and ready for the fuselage kit, which should be here next week for sure.
Before moving on, I had noticed a few rivets on the underside (rear spar) of the wing that needed some attention. These were difficult rivets to set with the squeezer, so I had used the gun and apparently made a mess without knowing about it. So I drilled them out and used my new bucking bar to fix them up. |
 |
| |
|
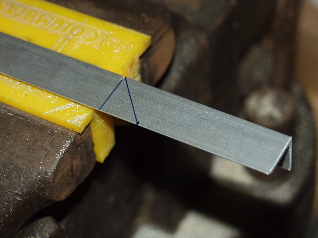
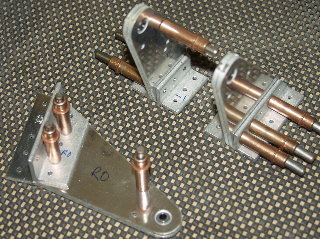
| The flap hinge brackets need to be fabricated from a long piece of aluminum angle, and the dimensions are on the plans. I made some careful marks with my fine-point sharpie, and then butchered it all up with my hacksaw! Just kidding. They actually weren't that difficult. I used the Scotchbrite wheel in my bench grinder to clean everything up, and the results are pretty acceptable. I've seen some cool little electric miter saws that are supposed to work really well on aluminum, but for now I'm using the old-fashioned method. |
 |
| |
|
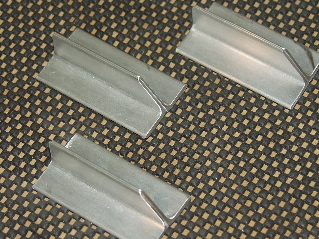
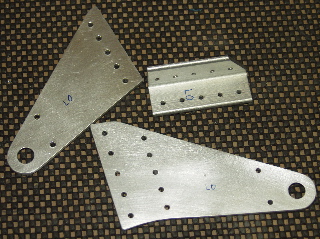
Here they are, all nice and polished up. These need to be drilled, and it looks like it might be sort of difficult, so I'm going to go surfing to see if anyone has a neat trick for doing these flap brackets.
Incidentally, this is one area where the Orndorff video isn't any help at all. He is building an RV-7/8 wing in the video, and the flap and aileron brackets are totally different than they are on the RV-9. |
 |
| |
|
| Lastly, I made angle cuts on these brackets, which you can't see because of the way I positioned the brackets. When I first took these pieces out of the packaging I thought they had been damaged in the shipping container. There's a weird crease on one end of each of them. I figured out that this crease is there on purpose, but it is strange to look at. It looks like they got caught in a door or something. |
 |
| |
|
8/6/04 - Flap Brackets - 4 hours
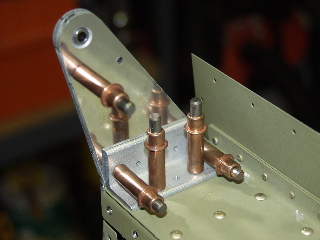
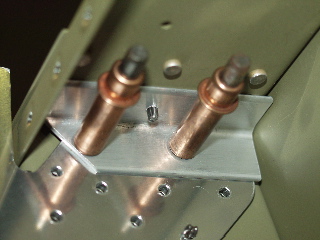
The aileron brackets are supposed to go together like this. Unfortunately, before I can rivet these together I need to take them apart, debur, scuff, etch, alodine, and prime the parts. So I took them all apart and got busy. |
 |
| |
|
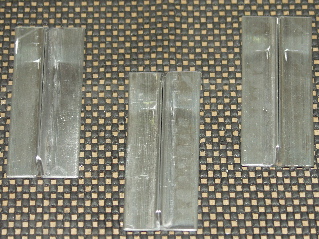
| Here are the parts of one bracket all deburred and scuffed. I hope to do a mess of alodining and priming tomorrow, so I left these apart for now. |
 |
| |
|
The next step involves the attachment of the flap hinge brackets to the wing. There are three parts which have to be assembled. The problem is that it is hard to stabilize the parts while the holes are drilled. So I checked with Matthew Brandes, whom I haven't met in person but has been extremely hepful via email. He just completed his wings recently, and he gave me some tips. Here's what I ended up doing.
First, each bracket is clecoed using two holes already drilled in the rib as starting points. You can see in this picture that I have already started drilling the holes. |
 |
| |
|
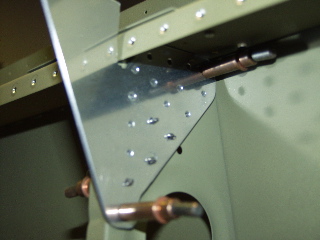
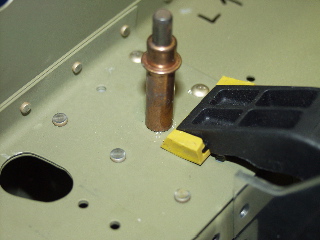
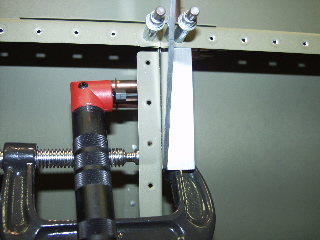
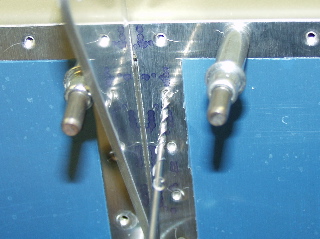
Once the pattern of holes has been match-drilled to the rib, the first angle bracket must be match-drilled to both the rear spar as well as the rib. So I used a spring clamp to hold the angle in position so I could drill one hole - the center hole on the rear spar.
For reference, you are looking at the bottom side of the wing, with the rear spar facing up. These first pictures are the "inside" side of the wing. |
 |
| |
|
Once this hole was drilled I put a cleco in it. This cleco, along with the clamp, held the angle in place as I drilled through the holes in the rib.
This picture is of the back side of the rear spar. |
 |
| |
|
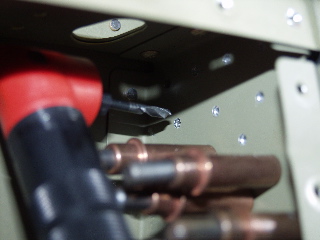
| Now the space is pretty tight. Far too tight to use a regular drill. So I got to use my handy-dandy angle drill. It worked great. I match-drilled each of the holes in the angle. I started with the one near the center. |
 |
| |
|
With each hole I would add a cleco to make sure it was held in place firmly.
For those of you who are just reading this and not building, this probably seems like way too many pictures for one set of brackets. You are probably right, but I couldn't really visualize this until I did it, so I'm hoping this will help someone else down the line. Besides, there are six of these brackets in all. |
 |
| |
|
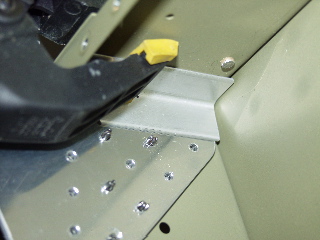
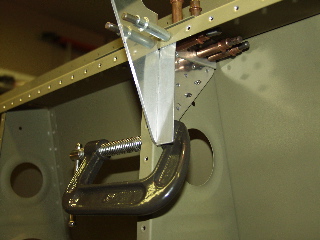
| Next is the second angle. This one needs to be installed with the joggle underneath the rear spar flange and parallel to the rib flange. I used a c-clamp to hold it in place while I drilled the first hole...the one in the spar flange. |
 |
| |
|
| I used an extended drill bit to drill the hole, since the flap hinge bracket was in the way. |
 |
| |
|
| With a cleco installed in that hole, I moved the c-clamp to the bottom to hold the angle parallel to the rib flange. Note that I used a little block of wood between the c-clamp and the rib to keep it from damaging the rib. |
 |
| |
|
| Once again I used the angle drill to match-drill the holes in the rib through the 925C (or whatever it's called.) |
 |
| |
|
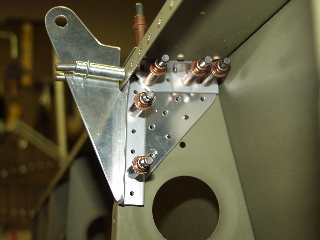
| Here is the bracket all finished and ready for riveting. Well, almost ready at least. First I have to finish the remaining flap hinge brackets. Next I have to install the bottom skins so I can match-drill the holes in the skins to the 925C angle. Then I will remove the skins and machine countersink the holes so they will accept the dimples in the skins. After that I will take all of this mess off of the wings and debur, scuff, etch, alodine, and prime. Good times. |
 |
| |
|
I had to go buy some more primer for this stuff since I used up all that I had when I did the wing skins. On my way back I stopped at Wal-Marcus (the Nieman Marcus for normal people). As I was parking I got a call on my cell phone from ABF Freight saying that my fuselage would be in Dallas on Saturday, and that they could deliver it Tuesday! So Tuesday is the big delivery day. More importantly, my wedding anniversary is Monday. 18 years. One wife. Good times. |
| |
|
8/7/04 - Flap Brackets/Gap Fairings - 7 hours
I finished the remaining five flap brackets and associated angle pieces. Then I re-installed the bottom skins so I could match-drill the holes in the bracket with the joggle in it (925C?) |
 |
| |
|
I used an extended drill bit to match-drill the holes. Note to anyone building: It's probably best to avoid dimpling these holes until after you've match-drilled the bracket. I accidentally dimpled these, and it probably won't matter, but it would have been best to dimple them afterwards.
I got all of them drilled and looking good. I can't countersink the pieces until I remove them from the wing, because there's just not enough room up next to the flap hinge bracket. |
 |
| |
|
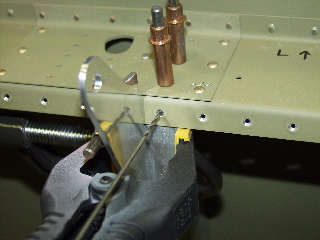
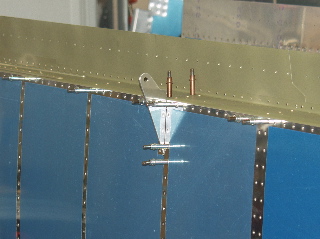
| As I finish these I stand back and admire my work. Then it hits me: "Oh Cr@p!" I was supposed to verify the alignment of the center flap hinge bracket before I drilled it! Aargh! What an idiot I can be sometimes. So, with much fear I got out my string and proceeded to see what the damage looked like. |
 |
| |
|
Whew, you gotta love these CNC-drilled kits! Both sides were dead-on. When I rivet these permanently I will do this again before I rivet the center one, but I was totally relieved to see that I don't have to start over!!!
Next, I worked on the aileron and flap gap fairings. These thin pieces of metal are placed along the trailing edge of the wing and serve to make the interface between the wing and the ailerons/flaps more aerodynamic, reduce drag, and increase speed. Speed is good. |
 |
| |
|
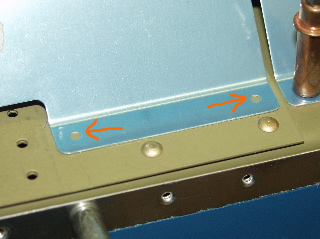
| Mine went on without a hitch, so I match-drilled them to the rear spar and the wing skins. The only weird thing was that the instructions say that there will be some holes in the rear spar that will need to be match-drilled through the fairing. In reality, the holes are punched in the fairing and they need to be match-drilled through the rear spar. It may seem obvious, but when I saw these holes without any corresponding holes in the spar I spent probably 30 minutes making sure I didn't make some sort of mistake. After much consideration I decided it must be a misprint and went ahead and match-drilled through the spar. Note that the rivet holes are #40 on the skin side and #30 on the spar side. Also, the skin holes need to be dimpled, butt he spar holes don't. Tricky tricky. |
 |
| |
|
| Next: Ailerons |
|
| |
|
