|
| |
Cool
Tools |
| |
|
| |
Bandsaw
I finally broke down and bought a bandsaw. I had been using a jigsaw and a hacksaw to cut parts when necessary, but upon looking at the instructions for the fuselage, I decided that I was going to have my hands full cutting pieces to shape from aluminum angle. I had also been pretty frustrated by the way that the aluminum tends to bond to the steel saw blades on my jigsaw.
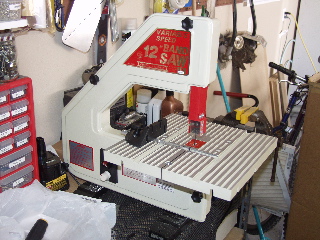
For $90 (after discount) I was able to pick up this three-wheel bandsaw from Harbor Freight. It probably won't hold up to lots of everyday use, but I really only need it once in a while so I didn't want to pay a fortune. I would probably spend almost $90 on replacement blades if I kept using my jigsaw. This thing has a variable speed control, which is great for cutting thick aluminum. |
| |
|
| |
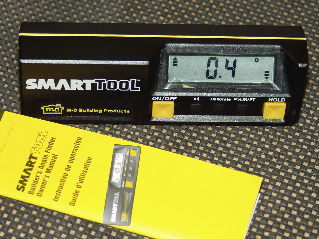
SmartTool
If I am going to build this plane straight and true, then I need to know what straight and true is...exactly. So, I decided to buy yet another outrageously expensive tool. It really is a cool device. You calibrate it on a flat surface by measuring the angle of the surface with the tool facing you and then facing away from you, and then flipping the tool upside down and again measuring the angle in both directions. Once this is done it is accurate to 1/10 of a degree. Try that with your Uncle Wally's carpenter-level. One of the coolest features is the audible alarm. It will beep when you have the tool level, so you can place it on a large surface (like a fuselage) and not have to look at the tool while making adjustments. When it beeps, you are level! I may have smileys on my wings, but at least my fuselage will be straight (I hope).
|
| |
|
| |
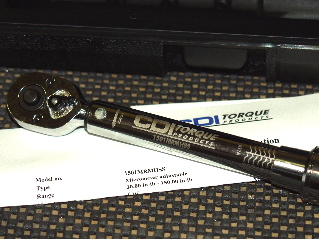
Torque Wrench
After a horrible experience with a torque wrench I bought from Harbor Freight, I decided that I would spend the money and get one that I could trust. After all, it's an airplane, not a bicycle. There are lots of AN bolts that need to be torqued to exact values, and I was at a loss as to how I was going to obtain any accuracy with the cr@ppy torque wrenches I have. So, I went searching at Oshkosh for a good 1/4" drive torque wrench with inch pound measurements that were certified accurate. Snap-on had a really nice wrench, but they wanted almost $200. This one is really good, and although it costs twice as much as an import, I feel it is worth the money in the long run. When I start rebuilding the engine I will need to get a larger one with foot pounds, but this one is just what I need for these small AN bolts. I ended up buying it from Avery, since they didn't yet have enough of my money.
|
| |
|
| |
Bucking Bar
This is not a very glamorous tool, but I needed one for getting into tight spaces where there are already rivets installed on mating surfaces. This one has a little lip that sticks out but still provides enough bulk to make it a useful bucking bar. I found this one at Oshkosh from US Tool. 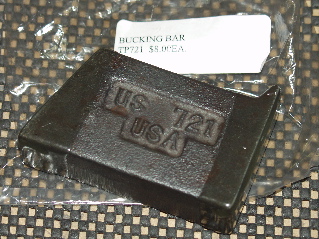
|
| |
|
| |
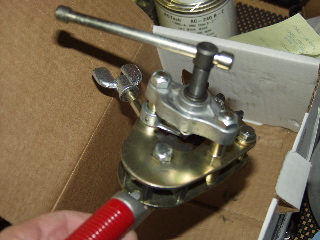
Flaring Tool
The aluminum tubing that I use to connect the fuel tanks, and probably lots of other stuff, needs to be flared to 37 degrees on the end. This is done with a fancy tool called a Parker Rolo-Flair Flaring Tool.
|
| |
|
| |
Tank Dimple Dies
When you rivet the tank skins, you have to use ProSeal to seal the rivets so they don't leak fuel. When you put ProSeal in the rivet hole, it can make the machine head of the rivet protrude from the skin just a little. These special dimple dies are made to dimple the skins a little more deeply than the regular ones to account for the thickness of the ProSeal.
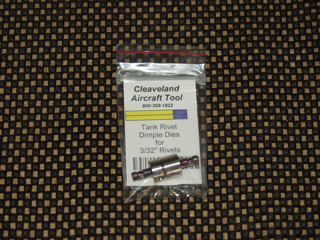
I bought these from Cleaveland Aircraft Tool. I'll let you know how they work.
Update: Yes, they work great. However, even with these dies there were some rivet heads which stood up a bit more than normal. I can imagine that the normal dies would have made all of the rivets stand up in a similar manner. |
| |
|
| |
Ratcheting Crimping Tool
I have never had much success with crimp-on electrical connectors. That's probably because I've used the wrong tool to do the crimping. So, when considering the magnitude of this project, I decided that the right tool for the job would be a good thing.
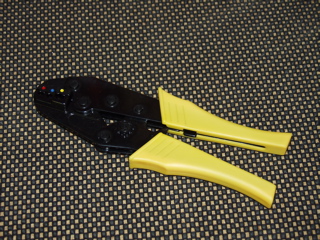
I bought these from Avery. I'll let you know in a few days if they work. |
| |
|
| |
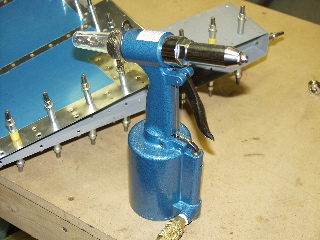
Pneumatic Squeezer
I bought a pneumatic rivet squeezer on ebay for $155. I had been
searching for one for quite some time, so finally finding one is
quite exciting. This one is old and beat up, but it works.
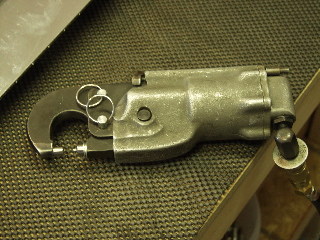
This
thing is great. Since I have lots of times where I am working by
myself,
this tool will come in really handy. Where my manual squeezer works
fine, it is definitely a two-handed tool, which makes holding the
workpiece difficult. The pneumatic squeezer can be operated with
one hand, allowing me to hold the workpiece steady. It also makes
beautiful rivets.
|
| |
|
| |
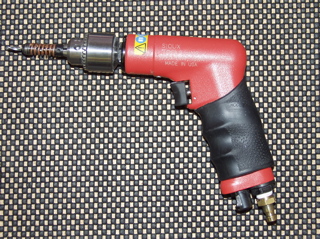
Sioux Air Drill
If you have to drill as many holes as I am drilling, you might want to consider getting a really good drill. At first I had planned on using a cordless drill, but decided at the last minute to include the Sioux air drill in the Avery kit. This has turned out to be a really good decision because in addition to turning really fast, it is also small enough to get into most of the tight places I have been faced with. Besides, air drills sound really cool.
|
| |
|
| |
Pneumatic Pop-Rivet Puller
A friend of mine is building a Sonex, which is almost completely
assembled with blind rivets. He let me borrow one of these tools when
I was having trouble with my pop-riveting tool. Wow, it is so easy
to use, and much more manageable. So, I started watching Harbor Freight
for a sale on this item, which they seem to have on a regular basis.
I finally got one for about $30 I believe. It works
great and doesn't bounce off the rivet head like my old hand puller
did. I recommend skipping the hand tool and buying one of these for
only a little more money, unless you don't have a compressor, in which
case you should go buy a compressor first! |
|
