|
| First Flight |
| |
|
Previous: Final Steps: Misc. |
|
| |
|
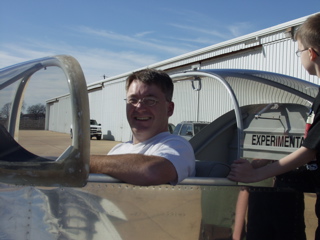
01/29/2006 - First Flight - 0.5 hours
First Flight Video (11meg QuickTime)
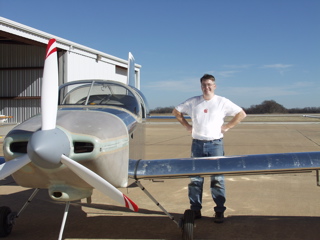
Today turned out to be a really pretty day. It was a bit windy, but definitely a good day for a first flight. I went out to the airport after church and got everything set up. I started by checking the tire pressure. I found my first flight test card and put it in the cockpit. I also used some duct tape to secure my fire extinguisher to the passenger seat pan, just in case. I didn't want that cylinder rolling around. When everything was set, I rolled the plane out of the hangar and called for the fuel truck. |
 |
| |
|
I had decided to go ahead and fly with a full load of fuel since it would more closely resemble the flights I had made in my transition training with two people on board.
I did a complete preflight. Actually, I did it three times. I verified everything was all set. I even found a loose screw on one of the access panels, so I tightened that up. I then sat in the cockpit for a little while just making sure everything was the way I wanted it. All set to go.
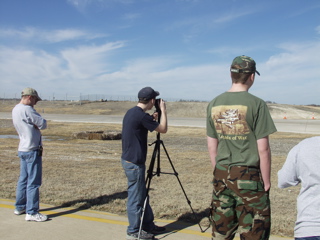
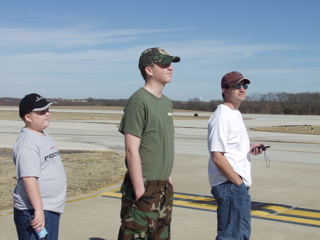
The next thing I did was to give a briefing to everyone on the ground who came to watch. I explained what I expected to do and told them a good place to go watch (and take video.) |
 |
| |
|
I made a phone call to the FAA tower here at TKI and spoke with the controller on duty. He was very cooperative when I told him what I wanted to do louis vuitton outlet. He said he'd give me a generous opening when it came time to land, etc.
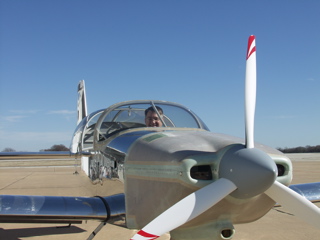
So with everything set, I jumped in the plane and started the engine. This was familiar territory since I had started it and done a couple of taxi tests. I found that I could steer it quite well just with the rudder, so I only used the brakes when I needed to stop or make a tight turn. |
 |
| |
|
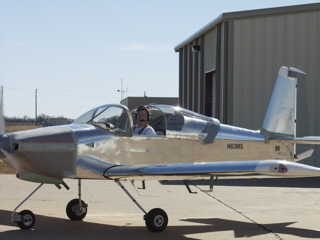
I got clearance with ground to taxi to runway 17. Here at TKI the runway is over 7,000 feet long, which gave me quite a few options if rolex replica I were to have any troubles.
I did a runup and checked everything out. I had made a slight change to the exhaust brackets to move them away from the cowl slightly, and I could tell that I had much less vibration as a result.
The plane was ready to go, so I called for takeoff clearance. |
 |
| |
|
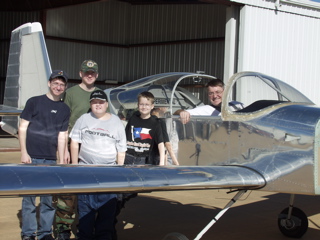
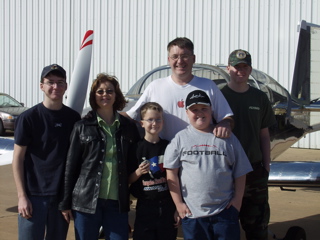
The crowd on hand included James Redmon, who flies a Berkut that he built. Todd Agold and his family were there. Todd built a Sonex and is currently building an RV-10. My wife and four sons were also there and they took the video and photo account of the event.
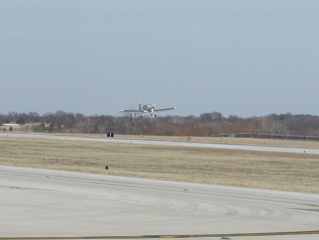
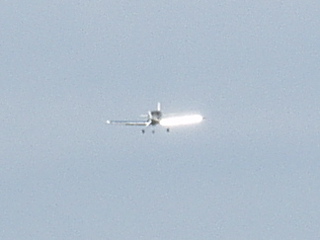
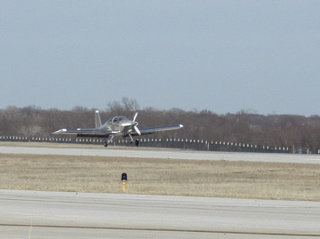
As with most RVs, this one didn't take long to get off the ground. I was cautious in applying power, so my first takeoff was a bit longer chanel outlet than it could have been, but I was still off in 1000 feet or so. I watched the airspeed and noted that I rotated at about 60 mph. |
 |
| |
|
 |
 |
| |
|
The next thing I knew I was at pattern altitude at the end of the runway. I had set my climb speed at 100mph and it did a good job. I didn't look at my rate of climb, but I did record the data from the EFIS, so I plan to look at the flight data later on to see exactly what happened that I missed.
I climbed to 3000 feet and then set the trim for level flight. I didn't adjust the throttle until I was on upwind at 3000 feet. Then I just adjusted the RPM to 2400. Flying great. The air was clear. I could see the downtown Dallas skyline. (Too bad it's in bravo airspace.) |
 |
| |
|
 |
 |
| |
|
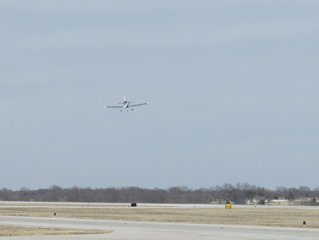
I ended up doing five (I think) circuits around the airport. The third one was at reduced speed. I set up at 80 mph and extended the flaps. I flew one circuit in this configuration to get an idea of the slow flight characteristics, and to see what it would be like when I was landing. Solid. So, one more circuit at full speed and then I decided I'd better land so the people on the ground could start breathing again.
On the upwind leg I talked to tower and got permission to enter the pattern. I descended into the pattern and flew a normal approach. |
 |
| |
|
 |
 |
| |
|
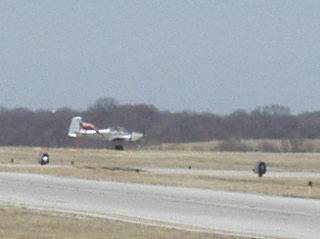
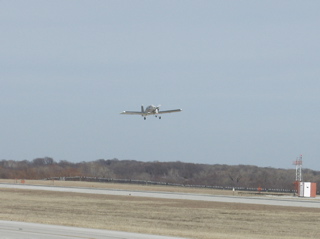
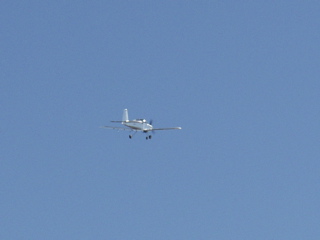
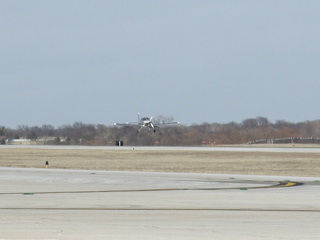
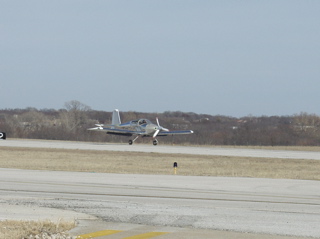
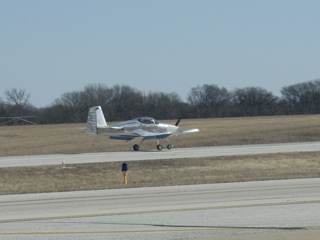
Hey, did I mention the crosswind? I held a crab angle down the centerline until I was ready to flare. You can see the right wing dipped a little as I touched the right wheel first. I have to say that landing this plane is really quite easy.
The pictures look like the prop isn't spinning. That's just the shutter speed of the camera, because it was definitely still spinning on landing.
I got congratulations from the guys in the tower and they cleared me to taxi. |
 |
| |
|
 |
 |
| |
|
So, finally, after more than two years of work, I can now agree that flying something that you've built in your garage with the help of your kids (and wife) will definitely put a grin on your face. I'm still grinning as I write this.
Yes, there are a couple of very small issues that I will fix tomorrow. |
 |
| |
|
 |
 |
| |
|
1/30/06 - Pitot/Static/Transponder Test
So, what items did I find after the first flight? Not many, really. There's a piece of the rubber edge stripping that goes around the wing root fairing that came loose. It's on the bottom of the wing. I guess I had just left it too long. I'll trim it and we should be good.
Upon removing the cowl I could tell that there was a small oil leak somewhere on the right side of the engine. Upon further inspection I found that the hose that goes from the engine to the oil pressure transducer was loose at the engine. It's a restrictor fitting so it wasn't a lot of oil, but it was definitely loose enough to leak. I tightened it up nicely.
Thinking about this a bit more in reference to my flight, I was getting some low oil pressure warnings when I throttled back. It wasn't evident at the time what the problem was. I was sort of figuring that I had just set the oil pressure limits too high, but the loose hose may have contributed to the indication.
Now to the pitot/static tests. I had scheduled Bryan Wriston to stop by and do these tests, so that meant I couldn't do any flying today. Instead I spent three hours with Bryan testing the plane. He hooked up his test instruments to the pitot and static ports and set up a transponder antenna under the plane. Immediately we found that the pitot tube (Dynon) had some leakage which was probably part of the drain that's incorporated into the tube. He said this was pretty common. So, we removed the pitot tube and attached directly to the pitot line.
We flew the EFIS down to -1000 feet and up to 20,000 feet in 1000 foot increments. Everything checked out within IFR limits. He said it was really solid. I'm very glad that I went with the kit from Tony at SafeAir1. Bryan said he sees all sorts of strangeness in homebuilts and that the Van's recommended method of using a pop-rivet for the static ports causes more trouble than just about anything.
The AHRS and EFIS from Grand Rapids did a great job. With his test set installed, I calibrated the adjustment in the AHRS altimeter setup screen.
The EIS also has airspeed and altitude, and although it wasn't quite as accurate as the EFIS, it was still within IFR limits.
The transponder tested out perfectly.
So Bryan gave it an IFR signoff for the next two years. I'm not set up for flying IFR, but it's good to know that my indicators are that accurate. This will be especially important as Dallas has a big chunk of bravo airspace that I may need to traverse from time to time.
If you're in the Dallas area and you want someone who is willing to work with experimentals, give Bryan Wriston a call. He charged $195 for the three tests, which is sort of expensive, but Bryan was very thorough and now I'm totally legal. |
| |
|
1/31/06 - Electrical trouble
Today I went out to fly again. I got to the run-up area and that's as far as I got. When I did the mag check I noticed some power reduction when I switched to the "both" setting. So I checked again, but this time the engine died altogether when I switched to the electronic ignition alone. So I went back to the hangar (running on the mag only) and began to troubleshoot. A couple of calls to Klaus at Lightspeed had me tracking it down to the power connection to the electronic ignition unit.
Now, I don't know how or why this happened, but the fuse block that I was using as the battery bus was not working at all. There was voltage at the post, but not on the other side of any of the fuses. Weird. These things are not very complex. Anyway, I took it out and temporarily hooked the ignition directly to the battery wire and everything tested fine. Upon examining the fuse block more closely, it isn't the same type as the other two I used, and it looks like a lower quality item.
So, now I've got an order in to B&C for a breaker and a new fuse block. I'm going to put th electronic ignition on a breaker this time to avoid any problems with the fuse block. This is how Klaus has it in the Lightspeed instructions, but in my attempt to avoid all breakers, I opted to use a fuse instead. Looking back this was probably a bad idea, so from now on it will have a breaker. The breaker will be on the subpanel next to the fuse block.
Until I get this fixed the plane is grounded. That's okay because today the weather isn't so good. Hopefully I'll get it fixed before the weekend. |
| |
|
2/2/06 - Second Flight - 0.5 hours
Well, I got the parts from B&C and reinstalled everything, including the new pullable breaker. I mounted it facing forward on the subpanel, so it could be reached if necessary. All of this took about two hours. Boy, laying on your back under the instrument panel for two hours is not a lot of fun.
The fun started soon after I finished. I pulled the plane out of the hangar and spoke with the tower again to make sure they were okay with my plans. I did the run-up and this time I had full power and the electronic ignition worked fine. Man, the electronic ignition is definitely the way to go. The engine performs so much better when running with the electronic ignition. There's really no drop when you turn off the mag since the spark is so hot on the electronic side.
So, I took off and climbed to 3000 feet. I noticed climb rates of about 1000fpm at 100mph. At 3000 feet I leveled out and made a rectangular pattern around the airport. On this flight I did a little bit of leaning, and I engaged the autopilot for a little while. I had done the ground calibration, but the autopilot still needs to be calibrated in flight.
The landing today was so easy. I flew the approach at 80 with full flaps and with no crosswind the plane pretty much landed itself. What a totally great airplane.
I pulled the cowl off after the flight and this time I didn't see any oil leaks. I did have one minor issue today. The #2 EGT sensor was acting strange, which probably means I have a bad connection somewhere. I will hunt this down before the next flight.
The president is coming to the area tomorrow. As a result, there's a big TFR that affects the airport for several hours, so I'm not sure if I'll get to fly. |
| |
|
Next: First 10 hours |
|
| |
|
|
|
